

What is a wall‑pack light
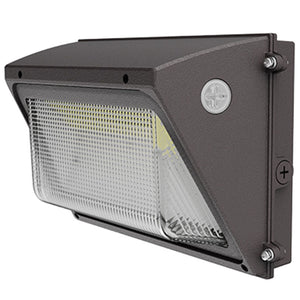
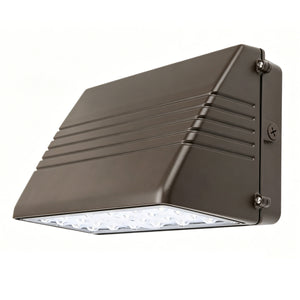
A wall‑pack light is a heavy‑duty, weather‑proof outdoor lighting fixture that mounts directly on building exterior walls. It delivers bright, outward‑and‑downward directional light mainly for security and area illumination.
Main features
- Structure Most have a tough die‑cast aluminum housing and tempered‑glass or polycarbonate lens, usually IP65/IP66 rated against rain and dust. Old‑style units used metal‑halide or high‑pressure‑sodium lamps; nearly all modern versions are LED‑based.
- Common built‑in controls
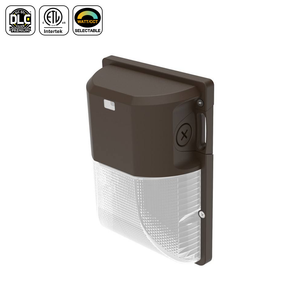
- Photocell (dusk‑to‑dawn): Auto‑on at sunset, auto‑off at sunrise, no manual switch needed.
- Optional PIR motion sensor: stays dim / off, brightens only when movement is detected for extra security.
- Typical uses Warehouses, factories, commercial buildings, apartment blocks, parking lots, walkways, entry doors and building perimeters. It improves pedestrian safety and helps security cameras work better at night.
- Different types
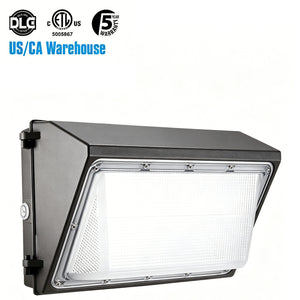
- Forward‑throw wall pack: casts light far away from the wall for large parking areas.
- Full‑cutoff wall pack: all light points downwards, reduces light pollution for dark‑sky regulations.
- Slim wall pack: low‑profile for cleaner‑looking building facades.
Difference from ordinary wall lamps: Wall‑packs focus on powerful functional area lighting, not soft decorative ambient light.
Simple one‑sentence summary
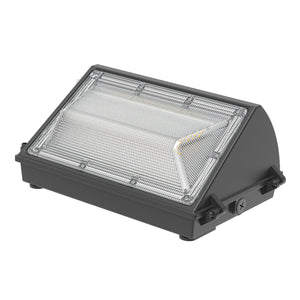
A wall‑pack light is a robust wall‑mounted outdoor security light that shines onto ground and surrounding areas; many turn on and off automatically from dusk till dawn.
How to install a wall‑pack light
Important safety warning: Cut circuit power off completely before starting work; use a voltage tester to confirm no electricity remains. Outdoor high‑voltage work is risky. If you lack electrical experience, hire a licensed electrician. Follow local electrical codes.
Tools you will need
- Voltage tester, screwdrivers, drill + masonry drill bits (brick/concrete wall)
- Outdoor silicone caulk, wire nuts / terminal connectors
- Heavy‑duty wall anchors (for brick, concrete, stucco)
- Ladder, safety glasses, work gloves
Step‑by‑step installation
Step 1: Choose the mounting location
- Pick a solid wall surface close to an outdoor electrical junction box.
- Typical mounting height: 3–6 m above ground. Angle the light slightly downward for better ground illumination.
- Avoid deep shade over the photocell, or dusk‑to‑dawn auto‑on‑off will fail.
Step 2: Prepare the fixture
- Loosen housing screws and open the wall‑pack cover / lens assembly.
- Remove the knockout plug on back for cable / conduit entry.
- If the unit has a separate mounting bracket, detach it from the main light body.
Step 3: Mount bracket to wall
- Hold the bracket against the wall aligned with the junction box, mark hole positions.
- Drill holes. For brick / concrete, install masonry anchors.
- Fasten the bracket firmly to the wall or junction‑box. Keep it level.
For weatherproofing: lay a bead of exterior silicone caulk behind the bracket (top and sides; leave bottom for moisture escape).
Step 4: Electrical wiring (power stays OFF)
Standard wall‑pack wiring (120‑277 V LED):
- Black fixture wire → Line (hot) power wire
- White fixture wire → Neutral power wire
- Green / green‑yellow fixture wire → Ground safety wire
Photocell (dusk‑to‑dawn model): Follow wiring label inside fixture housing. Most pre‑walled photocell wall packs only need main line‑neutral‑ground connection.
0‑10 V dimming models: Connect purple = Dim+, gray = Dim‑ to dimming controller wires (do NOT connect these to AC power).
Secure every joint with wire nuts. Tuck all wires neatly inside the junction box. Ground connection is mandatory for safety.
Step 5: Attach the light fixture
- Hang the main wall‑pack unit onto the installed bracket. Some fixtures use key‑slot mounting holes.
- Tighten locking screws to lock the light body in place.
- Check the built‑in rubber gasket sits flat, not pinched. Re‑fit lens/cover and close all housing screws.
- Seal unused knockouts and gaps with silicone sealant to stop rain and bugs from getting inside.
Step 6: Test operation
- Double‑check all wiring is secure. Close fixture housing fully.
- Turn circuit breaker power back ON.
- Cover the photocell sensor with your hand: light should turn ON. Remove your hand: light should turn OFF after a short delay. This verifies dusk‑to‑dawn function works.
- Adjust light aiming angle if needed.
Common installation mistakes to avoid
- Skipping grounding → big electric‑shock risk.
- Pinching or omitting the rubber gasket, no silicone sealing → water leaks, early fixture failure.
- Photocell facing toward other bright lights → the light stays off at night.
- Using weak plastic anchors on brick/concrete → fixture may fall in strong wind.
- Overtightening screws on stucco walls, cracking the surface.
For motion‑sensor wall‑packs
Wiring is identical to standard LED wall packs. After power‑on, set detection range, hold‑on time, and brightness via dip‑switches inside the fixture.
Advantages of Using Wall Pack Lights
Wall‑pack lights are widely used for commercial, industrial and residential outdoor lighting, with these main benefits:
1. Excellent outdoor security & safety
- Bright, wide‑area illumination for building walls, entryways, parking lots, alleyways and perimeter zones.
- Reduces hiding spots for trespassers; improves visibility for pedestrians and drivers to prevent trips and falls.
- Many models come with built‑in photocells (dusk‑to‑dawn) or motion sensors. Lights activate automatically without human operation.
2. High energy efficiency (LED versions)
- LED wall packs consume far less electricity compared to old metal‑halide or high‑pressure sodium wall packs. They cut down monthly electricity bills.
- Convert most energy into light instead of waste heat.
3. Long service life
- Quality LED wall packs typically last 50,000 hours or more.
- No fragile filaments or gas arc tubes. Lower frequency for replacement and less maintenance work, perfect for high‑mount hard‑to‑reach positions.
4. Durable weather‑resistant build
- Die‑cast aluminum housing plus sealed IP‑rated enclosure. Resist rain, snow, dust, humidity and temperature swings.
- Good resistance against vandalism and physical impact. Suitable for harsh outdoor conditions.
5. Easy installation & flexible mounting
- Designed for wall‑mount installation. Fit onto exterior walls or standard electrical junction boxes.
- Adjustable beam angles let you aim light exactly where you need it. Avoid unnecessary light spill onto neighboring properties.
6. Low operating labor cost
- Dusk‑to‑dawn photocell models turn on at night and shut off at sunrise automatically. No manual switching.
- Less maintenance means fewer service calls, ideal for warehouses, retail buildings, apartment complexes and factories.
7. Good lighting quality
- Available in multiple color temperatures. Cool‑white light delivers sharp, clear vision for security purposes.
- Instant full brightness when powered on, no warm‑up waiting like traditional HID lamps.
8. Cost‑effective overall
- Though the upfront purchase price may be higher than old‑style lights, savings on power, bulb replacements and maintenance make total long‑term costs much lower.
Short summary: Wall‑pack lights provide reliable outdoor security lighting, save energy and maintenance time, stand up to bad weather, and work automatically day‑and‑night.
Safety Precautions for Wall‑Pack Lights
Most hazards come from high‑voltage electricity, improper installation, water ingress, heat and glare. Both during installation and daily use, follow these safety points.
Installation safety
- Cut off power before any wiring work Turn off the corresponding circuit breaker. Use a voltage tester to confirm no live current. Never work on a live fixture. If you are not familiar with electrical work, hire a qualified electrician. Follow local electrical codes.
- Mandatory ground connection Always connect the ground wire. Without proper grounding, short‑circuits can cause electric shock risk, especially in wet outdoor weather.
- Use correct mounting hardware Match anchors for your wall material (brick, concrete, stucco). Do not use weak plastic fixings. A falling heavy wall‑pack can cause serious injury. Mount at a safe height out of children’s reach.
- Weather‑seal properly Keep gaskets intact. Seal knockouts and gaps with outdoor silicone caulk. Water entering the housing may cause short‑circuit, sparking or fixture failure. Do not block drainage holes at the bottom of housing.
- Correct voltage matching Check fixture voltage rating. Do not connect a 120V‑only wall‑pack to 277V power; overvoltage will burn components and create fire risk.
Daily usage & operation safety
- Avoid covering or blocking the fixture Do not hang banners, cloth, plants or other items over the wall‑pack housing. LED wall packs still generate heat. Blocking heat‑sink fins causes overheating and potential fire risk. Keep ventilation space around the unit.
- Photocell placement safety Do not cover the photocell sensor. If blocked, the light may stay on 24‑7 and overheat. Also avoid strong reflected light hitting the sensor, which makes it fail to turn on at night.
- Prevent light pollution & glare hazard Adjust beam angle downward toward the ground. Do not aim directly toward walkways, windows or public traffic areas. Severe glare can temporarily blind pedestrians or drivers and cause accidents.
- Keep away from flammable materials Maintain clearance from wooden siding, plastic trim, dry vegetation. Even LED units produce surface heat. Do not mount directly onto highly flammable surfaces unless the fixture is rated for that application.
Inspection & maintenance safety
- Always switch power OFF before cleaning, opening or servicing the wall‑pack.
- Check regularly: cracked lens, damaged gasket, loose mounting screws, corroded wiring. Stop using the fixture if you see burnt marks, smoke, flickering or strange burning smell. Replace damaged units promptly.
- Do not open the sealed LED driver compartment yourself. There are high‑voltage parts inside.
Extra notes for motion‑sensor wall packs
- Adjust sensitivity so the light is not triggered constantly by trees or small animals. Continuous frequent on‑off cycling accelerates component wear.
- Do not modify internal wiring or bypass built‑in protective circuits. Modifications void safety certification and create hidden dangers.
Quick summary
Key risks: electric shock from bad wiring, water‑caused short‑circuit, overheating fire hazard, physical injury from falling fixture, glare‑related accidents. Power off before service, ground correctly, seal against moisture, keep heat sinks unobstructed.
How to install a wall‑pack light
Important safety warning: Cut circuit power off completely before starting work; use a voltage tester to confirm no electricity remains. Outdoor high‑voltage work is risky. If you lack electrical experience, hire a licensed electrician. Follow local electrical codes.
Tools you will need
- Voltage tester, screwdrivers, drill + masonry drill bits (brick/concrete wall)
- Outdoor silicone caulk, wire nuts / terminal connectors
- Heavy‑duty wall anchors (for brick, concrete, stucco)
- Ladder, safety glasses, work gloves
Step‑by‑step installation
Step 1: Choose the mounting location
- Pick a solid wall surface close to an outdoor electrical junction box.
- Typical mounting height: 3–6 m above ground. Angle the light slightly downward for better ground illumination.
- Avoid deep shade over the photocell, or dusk‑to‑dawn auto‑on‑off will fail.
Step 2: Prepare the fixture
- Loosen housing screws and open the wall‑pack cover / lens assembly.
- Remove the knockout plug on back for cable / conduit entry.
- If the unit has a separate mounting bracket, detach it from the main light body.
Step 3: Mount bracket to wall
- Hold the bracket against the wall aligned with the junction box, mark hole positions.
- Drill holes. For brick / concrete, install masonry anchors.
- Fasten the bracket firmly to the wall or junction‑box. Keep it level.
For weatherproofing: lay a bead of exterior silicone caulk behind the bracket (top and sides; leave bottom for moisture escape).
Step 4: Electrical wiring (power stays OFF)
Standard wall‑pack wiring (120‑277 V LED):
- Black fixture wire → Line (hot) power wire
- White fixture wire → Neutral power wire
- Green / green‑yellow fixture wire → Ground safety wire
Photocell (dusk‑to‑dawn model): Follow wiring label inside fixture housing. Most pre‑walled photocell wall packs only need main line‑neutral‑ground connection.
0‑10 V dimming models: Connect purple = Dim+, gray = Dim‑ to dimming controller wires (do NOT connect these to AC power).
Secure every joint with wire nuts. Tuck all wires neatly inside the junction box. Ground connection is mandatory for safety.
Step 5: Attach the light fixture
- Hang the main wall‑pack unit onto the installed bracket. Some fixtures use key‑slot mounting holes.
- Tighten locking screws to lock the light body in place.
- Check the built‑in rubber gasket sits flat, not pinched. Re‑fit lens/cover and close all housing screws.
- Seal unused knockouts and gaps with silicone sealant to stop rain and bugs from getting inside.
Step 6: Test operation
- Double‑check all wiring is secure. Close fixture housing fully.
- Turn circuit breaker power back ON.
- Cover the photocell sensor with your hand: light should turn ON. Remove your hand: light should turn OFF after a short delay. This verifies dusk‑to‑dawn function works.
- Adjust light aiming angle if needed.
Common installation mistakes to avoid
- Skipping grounding → big electric‑shock risk.
- Pinching or omitting the rubber gasket, no silicone sealing → water leaks, early fixture failure.
- Photocell facing toward other bright lights → the light stays off at night.
- Using weak plastic anchors on brick/concrete → fixture may fall in strong wind.
- Overtightening screws on stucco walls, cracking the surface.
For motion‑sensor wall‑packs
Wiring is identical to standard LED wall packs. After power‑on, set detection range, hold‑on time, and brightness via dip‑switches inside the fixture.


